There is a specific kind of magic that happens when high-quality ingredients meet precise culinary technique. Our Creamy Pasta with Sweet Peas and Crispy Pancetta is the physical manifestation of that magic—a dish that balances the salt of cured pork with the delicate sweetness of spring vegetables, all bound together by a sauce so luxurious it feels like velvet on the tongue.
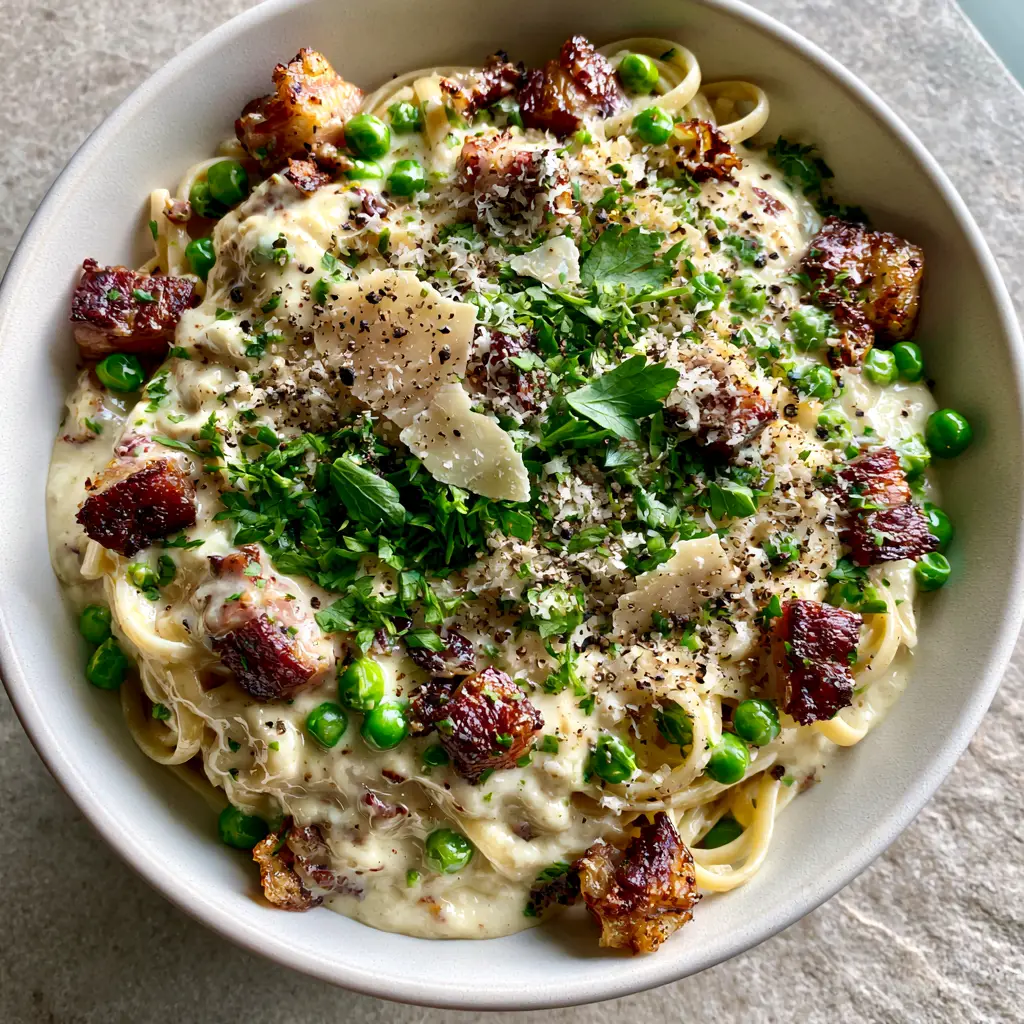
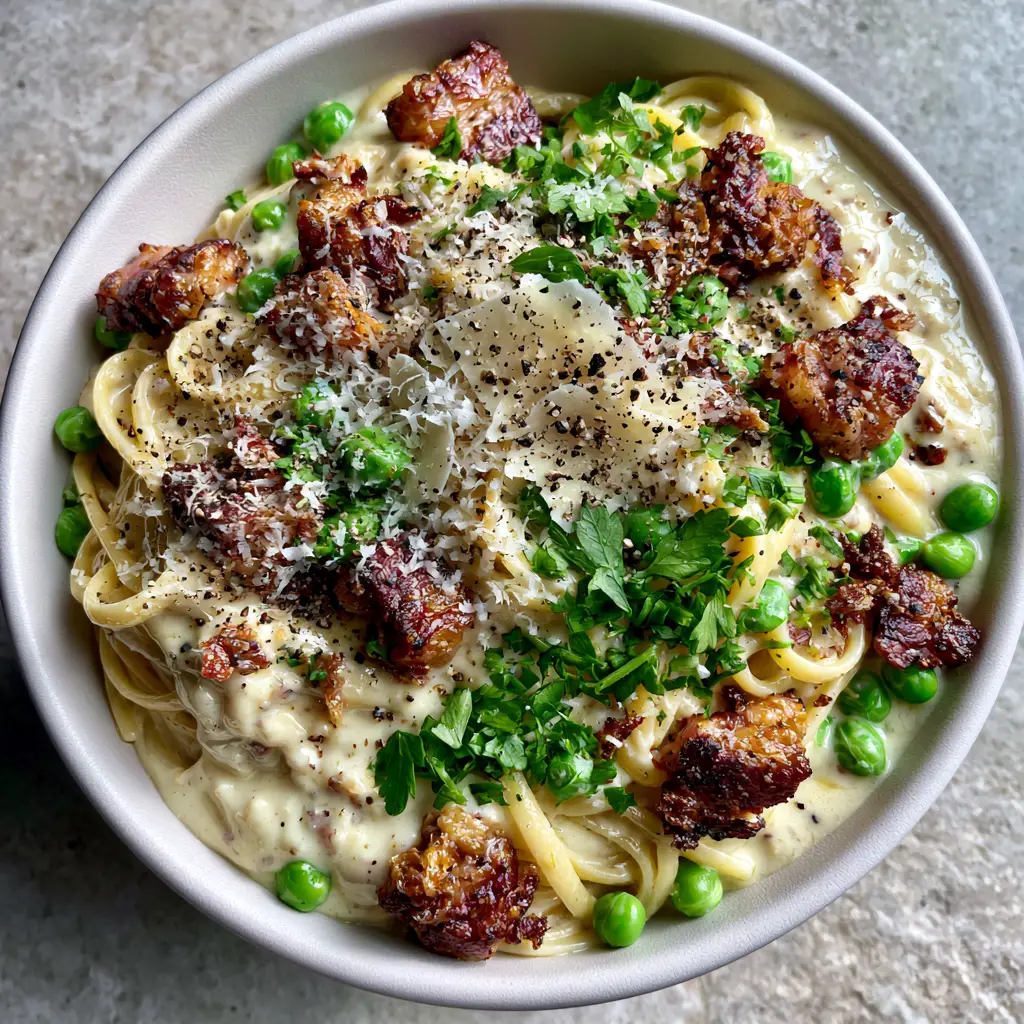
When you look at this dish, the first thing you notice is the contrast. You see the vibrant, emerald-green peas nestled against the ivory-colored sheen of the linguine. Then, the golden-brown, seared pancetta cubes catch the light, promising a satisfying crunch in every bite. This isn’t just a meal; it is a sensory experience designed for those who appreciate the finer details of home cooking.
Whether you are looking to elevate your weeknight routine or hosting a sophisticated dinner party, this recipe delivers restaurant-quality results. By following our forensic approach to texture and flavor, you will master the art of the perfect emulsion, ensuring your sauce never breaks and your pasta remains perfectly al dente. Much like our celebrated Italian pasta recipes, this dish relies on the harmony of simple, high-quality components.
Why You Will Fall in Love with This Velvety Linguine
- Textural Harmony: This dish masters the “Golden Trio” of textures: the snap of plump sweet peas, the crunch of crispy pancetta, and the silkiness of a Parmesan-infused cream.
- Visual Sophistication: Finished with a heavy dusting of micro-planed Parmesan “snow” and vibrant flat-leaf parsley, it looks like it was plated by a professional chef.
- Balanced Flavor Profile: The richness of the heavy cream is perfectly cut by the sharp bite of freshly cracked black pepper and the natural sweetness of the peas.
- The “Mantecatura” Effect: By finishing the pasta directly in the sauce with a splash of starchy water, we achieve a glossy, thick coating that clings to every strand of linguine.
The Visual Anatomy: Elements of the Perfect Creamy Pasta
To achieve the look of our signature handheld photo, we must focus on the “forensic” details of the ingredients. The pancetta must be cut into uniform cubes to ensure even searing, resulting in that deep golden-brown crust. If you enjoy the savory depth of pork in your noodles, you might also find inspiration in our creamy sausage pasta guide.
The peas are another critical visual component. We aren’t looking for mushy, dull-colored legumes; we want plump, “pop-in-your-mouth” sweet peas that retain their bright emerald hue through gentle steaming. This contrast against the matte white ceramic bowl creates a professional aesthetic that is as pleasing to the eye as it is to the palate.
Finally, the “Parmesan Snow” is achieved only through a micro-plane grater. This creates ultra-fine wisps of cheese that melt instantly upon contact with the hot pasta, adding to the sauce’s body without creating clumps. This attention to detail is what separates a good pasta from a legendary one.
The Essential Grocery List for Luxury at Home
Linguine (1 lb / 450g): We chose linguine for its flat surface area, which provides more “real estate” for the heavy cream sauce to cling to compared to round spaghetti. Ensure it is a bronze-die extruded brand for the best sauce adhesion.
Pancetta (6 oz / 170g): Look for thick-cut pancetta rather than the paper-thin slices. We want substantial cubes that can render their fat while maintaining a meaty center, much like the savory elements in our beef with pasta in creamy garlic sauce.
Sweet Peas (1.5 cups / 225g): Fresh or frozen both work, but they must be “petites” or “sweet” varieties. Their role is to provide a burst of moisture and sugar to balance the salt of the Parmesan.
Heavy Cream (1.5 cups / 355ml): This is the foundation of our ivory sauce. Do not substitute with half-and-half or milk, as the fat content is necessary to create the glossy, stable emulsion shown in the blueprint.
Parmesan Cheese (1 cup / 90g, freshly grated): Use real Parmigiano-Reggiano. The pre-shaken canisters contain anti-caking agents that will prevent your sauce from becoming “velvety” and instead make it “gritty.”
Fresh Flat-Leaf Parsley (1/4 cup / 10g): This adds the necessary herbaceous “lift.” It must be finely chopped to mimic the scattering of green seen in the visual prompt.
Foundational Additions: You will also need 2 tbsp (30g) of unsalted butter for extra gloss, 2 cloves of minced garlic for aromatic depth, and 1 tsp (5g) of freshly cracked black pepper to provide those iconic large dark flakes.
Professional Tools for a Restaurant-Quality Finish
To replicate the visual result exactly, you will need a few specific tools. A heavy-bottomed stainless steel skillet or cast iron pan is essential for searing the pancetta; it provides the even heat distribution required for that golden-brown crust. Avoid non-stick pans if possible, as they don’t develop the “fond” (browned bits) that adds deep flavor to the cream.
A micro-plane grater is your best friend for the finishing stages. This tool creates the “snow-like” texture of the cheese that sits atop the linguine. Additionally, a pair of stainless steel pasta tongs will allow you to swirl the linguine into the bowl, creating the “nest” shape seen in high-end food photography.
Mastering the Technique: Step-by-Step Culinary Breakdown
Step 1: The Rendering and the Crunch
Start by placing your cubed pancetta in a cold skillet. Turn the heat to medium and allow the fat to render slowly. This “cold start” method ensures the fat melts away, leaving you with perfectly crispy, golden-brown cubes rather than burnt edges and chewy centers.
Once the pancetta is crisp and the fat is foamy, remove the cubes with a slotted spoon and set them aside on a paper towel. Leave about 1 tablespoon (15ml) of the rendered fat in the pan—this is “liquid gold” that will season our entire sauce.
Step 2: Building the Ivory Base
In that same skillet over medium-low heat, melt your butter and add the minced garlic. Sauté for only 30-60 seconds until fragrant, being careful not to let the garlic brown. Pour in the heavy cream and bring to a gentle simmer.
Allow the cream to reduce by about one-third. You are looking for a visual cue: the bubbles should become smaller and the cream should begin to coat the back of a spoon. This is the stage where the sauce transforms from liquid to “glossy and rich.”
Step 3: The Al Dente Transition
While the sauce simmers, boil your linguine in a large pot of heavily salted water. Cook it for 1-2 minutes less than the package instructions. We want the pasta to finish cooking in the sauce so it can absorb the cream and Parmesan flavors directly into the starch.
Pro Tip: Before draining, reserve 1 cup (240ml) of the cloudy pasta water. This is the secret ingredient used in our creamy basil tomato pasta to help the sauce bind to the noodles perfectly.
Step 4: The Mantecatura (The Marriage)
Add the undercooked linguine and the steamed sweet peas directly into the skillet with the cream. Toss vigorously. Add the freshly grated Parmesan cheese and half of the reserved pasta water.
Continue to toss over low heat. The cheese will melt, the pasta water will emulsify with the fat, and a thick, velvety ivory sauce will form. If it looks too thick, add more pasta water a tablespoon at a time until the noodles look luxuriously coated.
Step 5: The Final Flourish
Fold in the crispy pancetta cubes right at the end to maintain their crunch. Transfer the pasta to shallow matte white ceramic bowls. Now, perform the forensic finish: a heavy dusting of micro-planed Parmesan, a scattering of finely chopped parsley, and a generous amount of cracked black pepper.
The Secret to That Signature Glossy Sauce Texture
The hallmark of this recipe is the “glossy” appearance of the sauce. This is achieved through emulsification—the scientific process of forcing fat and water to stay together. By using heavy cream (high fat) and pasta water (high starch), we create a stable bond that prevents the sauce from breaking into an oily mess.
Temperature control is vital. If the pan is too hot when you add the cheese, the proteins in the Parmesan will clump together. Always add your cheese over low heat or even with the pan pulled off the burner. This ensures the cheese melts into the cream smoothly, creating that thick, velvety texture described in our Midjourney prompt.
Storage Hacks for Maintaining That Creamy Consistency
Cream-based pastas are notorious for drying out in the fridge because the pasta continues to absorb moisture as it sits. If you have leftovers, store them in an airtight container for up to 3 days. To reheat, do not use the microwave alone, as it will cause the fats to separate.
Instead, place the pasta in a small skillet with a splash of milk or cream. Reheat over low heat, tossing constantly, until the sauce becomes glossy again. This essentially “re-emulsifies” the dish, bringing it back to its original restaurant-quality state. We recommend a similar approach for our baked macaroni and cheese to keep it from becoming dry.
Complementary Pairings to Elevate Your Dinner Table
This Creamy Pasta with Sweet Peas and Crispy Pancetta is a rich dish, so it benefits from sides that offer acidity or crunch. A simple arugula salad with a lemon vinaigrette provides a sharp contrast to the Parmesan cream. Alternatively, a side of roasted asparagus or steamed broccoli can add more green notes to the meal.
If you are looking for a more heart-heavy meal, consider serving this alongside a warm bowl of pasta e fagioli soup. For those who enjoy a variety of Italian textures, a crisp piece of garlic bread or a small portion of Italian pasta salad can round out the experience perfectly.
Expert Answers to Your Creamy Pasta Questions
Yes, you can substitute bacon, but it will add a smoky flavor that pancetta (which is cured but not smoked) does not have. Use thick-cut bacon to maintain the texture.
Absolutely. You can add frozen peas directly to the simmering sauce or the boiling pasta during the last 2 minutes of cooking; they thaw and heat through almost instantly.
Always grate your cheese fresh from a block. Pre-shredded cheeses are coated in potato starch which prevents melting. Also, add the cheese over low heat and toss constantly.
Reheat on the stovetop over low heat with a tablespoon of milk or cream. Toss continuously to re-incorporate the fats and liquids into a smooth sauce.
A thin sauce usually means the cream wasn’t reduced enough before adding the cheese, or not enough starchy pasta water was used to help it emulsify. Simmer it slightly longer next time.
The Master Recipe: Creamy Pasta with Sweet Peas and Crispy Pancetta
Creamy Pasta with Sweet Peas and Crispy Pancetta: The Ultimate Guide
Ingredients
Equipment
Method
- Place cubed pancetta in a cold skillet over medium heat. Cook until fat renders and pancetta is golden-brown and crispy.
- Remove pancetta with a slotted spoon and drain on paper towels, reserving 1 tbsp of fat in the pan.
- Cook linguine in salted water for 2 minutes less than package directions. Reserve 1 cup of pasta water.
- Steam peas lightly until plump and emerald green, then set aside.
- In the reserved pancetta fat, melt butter and sauté minced garlic for 30 seconds.
- Add heavy cream and simmer until slightly thickened and glossy.
- Add linguine, peas, and half the pasta water to the cream. Toss with Parmesan over low heat until a thick, velvety sauce coats the noodles.
- Fold in crispy pancetta. Serve in bowls topped with micro-planed Parmesan, cracked pepper, and fresh parsley.
Notes
Reserve more pasta water than you think you need to adjust the sauce consistency right before serving.
Closing & Call to Action
Mastering the Creamy Pasta with Sweet Peas and Crispy Pancetta is a milestone for any home cook. It teaches the importance of texture, the science of emulsion, and the beauty of high-quality ingredients. Once you see those glossy noodles against the vibrant green of the peas, you’ll understand why this dish is a visual and culinary masterpiece.
We would love to see your results! If you make this dish, please leave a comment below and tell us how your “Parmesan snow” turned out. Don’t forget to follow us on Pinterest for more visually stunning recipe inspiration and share this post with your fellow pasta lovers!