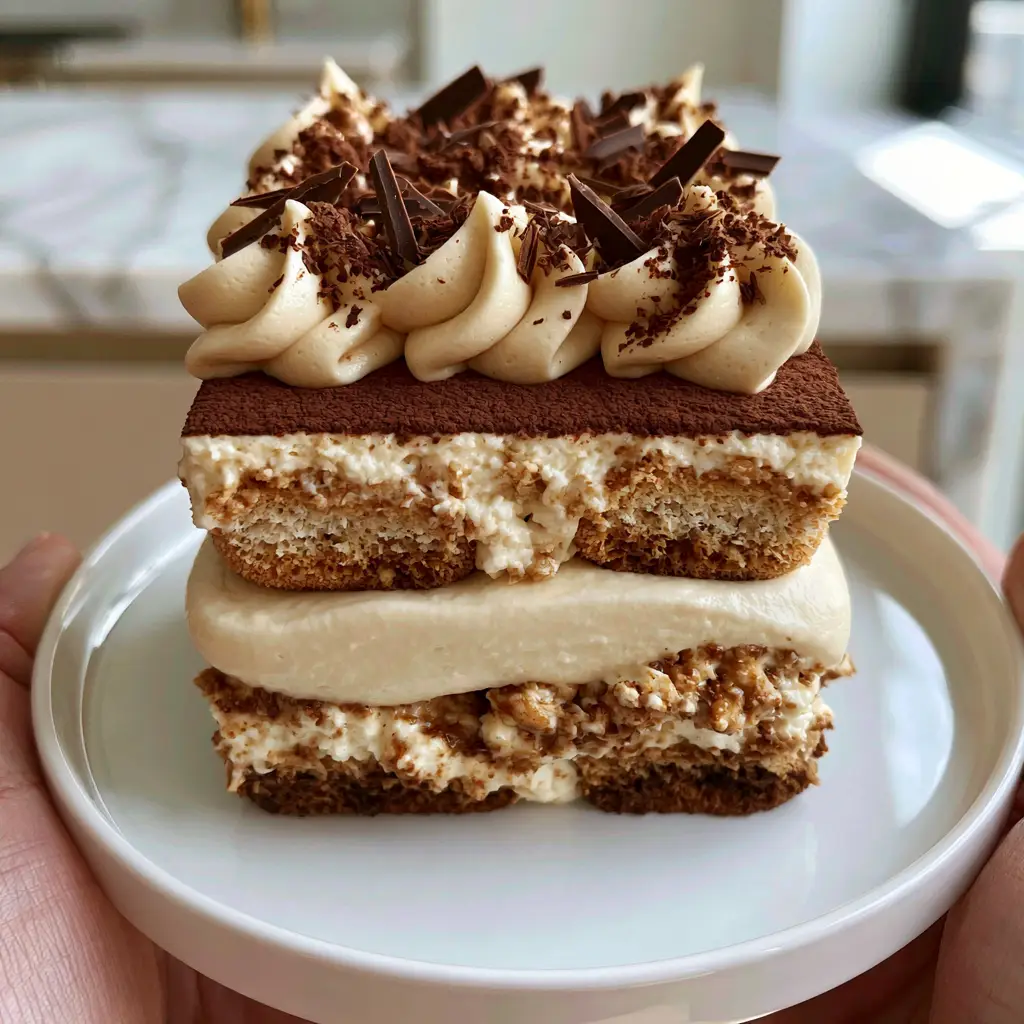
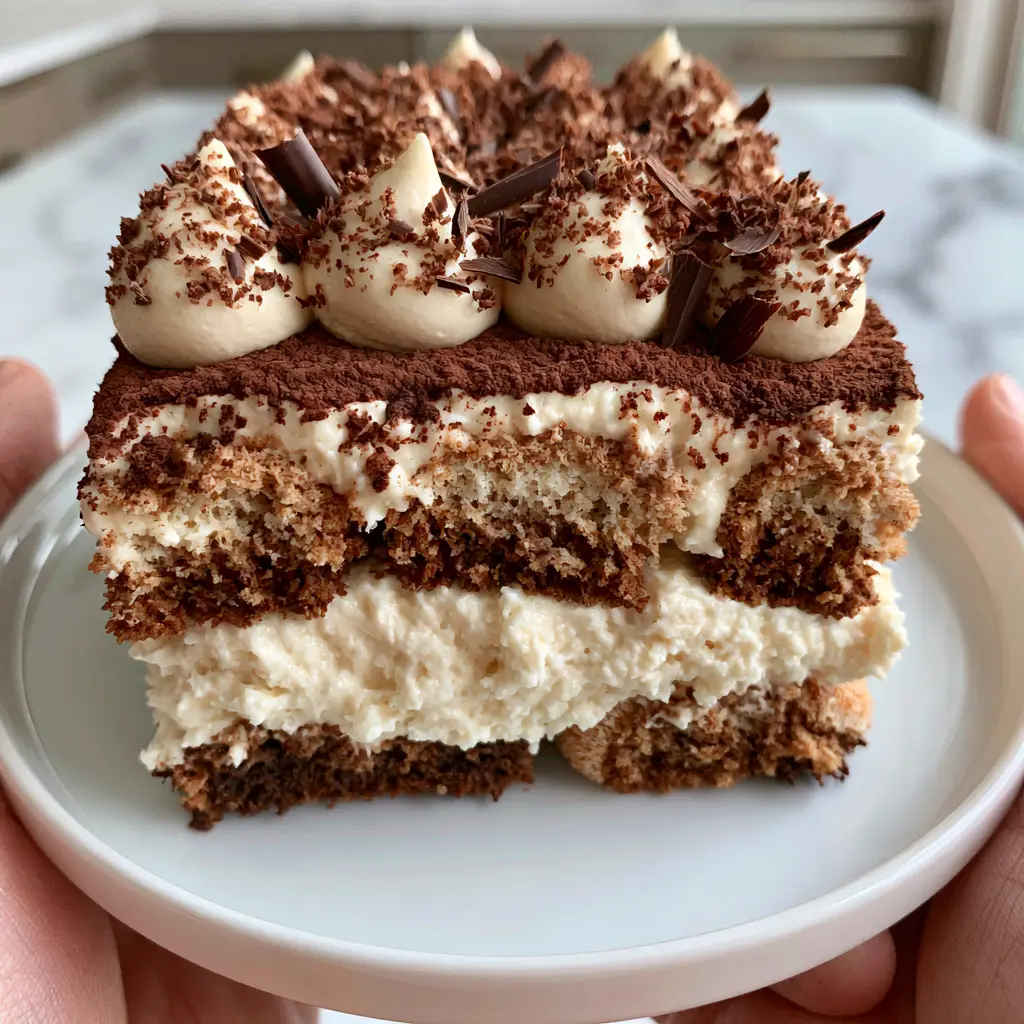
There is nothing quite like the sight of a perfect, thick square slice of authentic Tiramisu. When you lift that first forkful, you expect a specific architecture: a sharp cross-section showing perfectly stable, non-soggy layers that stand tall on a white ceramic plate.
This recipe is designed to bridge the gap between amateur home baking and professional pastry arts. We are focusing on the structural integrity of the espresso-soaked savoiardi ladyfingers and the velvety, pale-ivory density of a 2-inch thick mascarpone cream layer.
By the end of this guide, you will master the art of the piped mousse peak and the heavy, even dusting of fine dark cocoa powder that defines a world-class Tiramisu. This isn’t just a dessert; it is a masterclass in moisture control and aeration.
Why This Specific Tiramisu Recipe Delivers Professional Results
- Non-Soggy Foundation: We use a precise dipping technique to ensure ladyfingers are dark with coffee but remain firm and structured.
- High-Stability Cream: Our ratio of mascarpone to whipped egg yolks creates a 2-inch thick layer that won’t collapse when sliced.
- Visual Precision: Learn the exact piping technique to create the iconic mounds of mascarpone mousse seen in high-end Italian trattorias.
- Gourmet Texture: The addition of 70 percent dark chocolate micro-shavings provides a sophisticated snap against the soft cream.
If you are planning a full Italian menu, this dessert is the ultimate finale after a hearty ragù alla bolognese. It serves as a sophisticated crowd-pleasing party dish that looks as good as it tastes.
Essential Ingredients for the Perfect Tiramisu Architecture
Firm Savoiardi Ladyfingers: You must use the hard, biscuit-style Italian ladyfingers, not the soft sponge variety. These act as the structural “bones” of the dessert, absorbing espresso while maintaining their shape.
High-Fat Mascarpone Cheese: Use 1 pound (450g) of cold mascarpone. This Italian cream cheese provides the “pale ivory” color and the velvety mouthfeel required for a stable 2-inch layer.
Strong Dark Espresso: You need 1.5 cups (360ml) of freshly brewed, chilled espresso. The coffee must be dark and intense to penetrate the sugar-dusted biscuits without making them fall apart.
Large Egg Yolks: 6 large egg yolks provide the emulsification needed for a rich, stable mousse. They will be cooked over a double boiler to ensure safety and a thick, ribbon-like consistency.
Granulated Sugar: 3/4 cup (150g) of sugar sweetens the yolks and helps stabilize the protein structure during the whipping process.
Dutch-Processed Cocoa Powder: A heavy dusting of fine dark cocoa powder adds a necessary bitterness to balance the sugar. It should be applied in a dense, even layer.
70% Dark Chocolate: 2 oz (60g) of high-quality dark chocolate for micro-shavings. This provides a professional finish and a deep, complex chocolate flavor.
Heavy Whipping Cream (Optional Stability): 1 cup (240ml) of heavy cream can be folded in to ensure those piped mousse peaks stay perfectly upright for hours.
Professional Tools for a Clean Cross-Section
Achieving a sharp, clean slice of Tiramisu requires more than just a knife. You will need a 9×9 inch (23x23cm) square glass or ceramic baking dish to showcase the layers.
A large offset spatula is essential for smoothing the 2-inch mascarpone cream layer to a perfectly flat finish. For the top garnish, a large round piping tip and a reusable pastry bag are required to create the uniform mounds of mousse.
Finally, a fine-mesh sieve is non-negotiable for the cocoa powder dusting. This ensures there are no clumps and the coverage is as “heavy and even” as the visual blueprint demands.
Step-by-Step Construction of the Perfect Tiramisu
Phase 1: The Dark Espresso Soak and Preparation
Begin by brewing 1.5 cups (360ml) of high-quality espresso. Pour the hot coffee into a shallow bowl and allow it to cool completely to room temperature before adding 2 tablespoons (30ml) of dark rum or cognac if desired.
If the espresso is too hot, the savoiardi will absorb liquid too quickly and become mushy. We want a “dark with coffee” appearance while maintaining a firm interior snap.
Phase 2: Tempering the Egg Yolks (Zabaglione)
In a heat-proof glass bowl set over a pot of simmering water (double boiler), whisk 6 large egg yolks and 3/4 cup (150g) of sugar. Whisk constantly for about 8-10 minutes until the mixture triples in volume.
Look for a “pale ivory” color and a thick, ribbon-like texture. This process pasteurizes the yolks and creates the foundational stability for the thick cream layer.
Phase 3: Folding the Mascarpone Mousse
In a separate large bowl, slightly soften 1 pound (450g) of mascarpone with a spatula. Gently fold the cooled egg yolk mixture into the mascarpone in three additions.
If you are using heavy cream for extra-stable piped peaks, whip 1 cup (240ml) to stiff peaks and fold it in last. The result should be a thick, velvety mousse that holds its shape on a spoon.
Phase 4: The 2-Second Dipping Rule
Take a firm savoiardi biscuit and dip it into the espresso for exactly 1 second per side. Do not submerge it for longer, or you will lose the “sharp cross-section” visual.
Arrange the soaked ladyfingers in a tight, single layer at the bottom of your dish. They should look dark on the outside but still feel somewhat rigid in the center.
Phase 5: Layering for Height and Stability
Pour half of your mascarpone mixture over the first layer of ladyfingers. Use an offset spatula to spread it into a neat, 1-inch thick layer, ensuring it reaches every corner of the dish.
Repeat with a second layer of espresso-soaked ladyfingers, laying them in the same direction. This second layer provides the “thick square slice” structural support.
Phase 6: Piping the Mousse Peaks
Place the remaining mascarpone cream into a piping bag fitted with a large round tip. Pipe uniform mounds (about 1 inch high) across the entire surface of the Tiramisu.
These “stable piped mousse peaks” create a beautiful texture that catches the cocoa powder and dark chocolate shavings. Cover the dish loosely and refrigerate for at least 6 hours, preferably overnight.
Phase 7: The Final Visual Flourish
Just before serving, use a fine-mesh sieve to apply a heavy, even dusting of dark cocoa powder. It should completely obscure the ivory cream beneath.
Using a microplane or fine grater, shower the top with 2 oz (60g) of 70 percent dark chocolate shavings. This creates the “high-texture” look described in our visual blueprint.
Expert Tips for a Non-Soggy Tiramisu
- Quality of Biscuit: Never use “soft” ladyfingers from the bakery section; look for the “Forno Bonomi” or similar hard Italian brands.
- Temperature Control: Ensure your mascarpone is slightly softened but not warm, and your espresso is completely cold.
- Setting Time: Tiramisu is a dish of patience. The 6-hour rest period allows the ladyfingers to soften slightly from the cream’s moisture, creating a cake-like texture without the sogginess.
- The Clean Cut: To get that “sharp cross-section,” wipe your knife with a warm, damp cloth between every single cut.
Creative Variations and Pairings
If you love this texture but want a citrus twist, you should try our limoncello tiramisu. For those who prefer a more decadent, kid-friendly version, our chocolate lasagna offers similar layered satisfaction.
This Tiramisu is the perfect conclusion to a dinner featuring a buffalo chicken lasagna for a modern twist or a classic creamy cajun sausage pasta.
Common Questions Regarding Tiramisu Stability
This recipe uses a ‘Zabaglione’ method where yolks are whisked over a double boiler. This cooks the eggs to a safe temperature while creating a much more stable and thick cream than raw yolks.
The key is the ‘2-second rule.’ Dip firm Savoiardi biscuits for only 1 second per side in room-temperature espresso. Never use soft sponge ladyfingers, as they lack the structure to hold liquid.
For a sharp, clean cross-section, Tiramisu needs at least 6 hours to set. However, 24 hours is ideal as it allows the ladyfingers to soften to a cake-like consistency without losing their shape.
Runny cream usually happens if the mascarpone is over-mixed, causing the fat to break, or if the egg yolks weren’t whisked long enough to form a thick ribbon. Folding in stiff-peaked heavy cream can help stabilize the texture.
The Ultimate Authentic Tiramisu Recipe
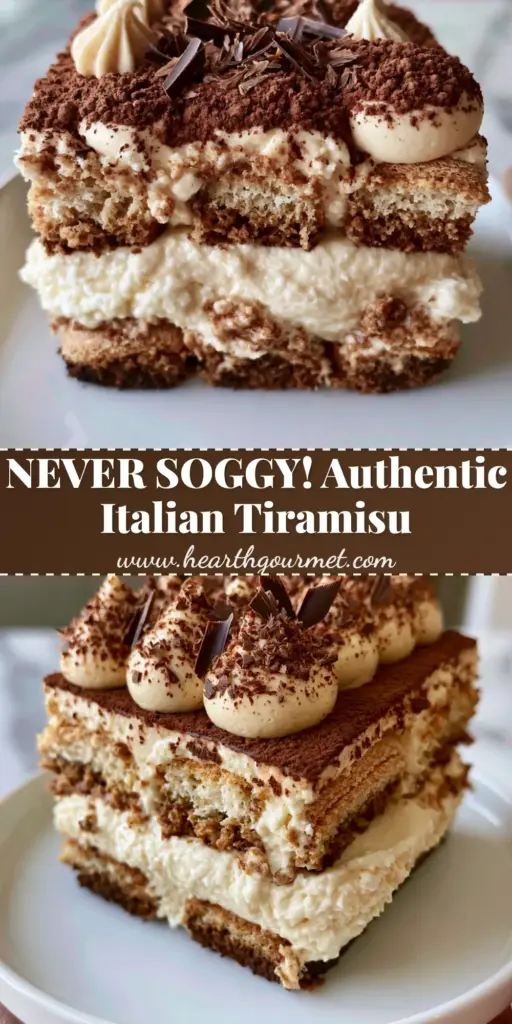
Tiramisu: The Ultimate Stable Layered Italian Dessert with Dark Chocolate Shavings
Ingredients
Equipment
Method
- Brew the dark espresso and let it cool completely in a shallow bowl. Stir in the rum if using.
- Whisk egg yolks and sugar in a double boiler until thick, pale ivory, and tripled in volume (about 10 mins). Let cool.
- Fold the cooled yolk mixture into the mascarpone until smooth. Gently fold in whipped cream if using for extra-stable peaks.
- Dip each ladyfinger for 1 second per side in espresso. Layer in the bottom of a 9x9 dish.
- Spread half the cream over the biscuits in a flat, 1-inch thick layer.
- Add a second layer of soaked biscuits. Pipe the remaining cream into uniform mousse peaks on top.
- Dust heavily with cocoa powder and sprinkle with 70% dark chocolate shavings.
- Refrigerate for at least 6 hours to allow the structure to set and flavors to meld.
Notes
Wipe your knife between cuts for a sharp cross-section.
Closing & Call to Action
Mastering this Tiramisu ensures you have a reliable, stunning dessert in your repertoire that never fails to impress. The combination of dark espresso, velvety mascarpone, and 70% dark chocolate creates a sensory experience that is truly unmatched.
If you enjoyed this recipe, please leave a comment below and tell us how your piped peaks turned out! Don’t forget to share your photos and follow us on Pinterest for more culinary inspiration.