The Peanut Butter Lasagna is the ultimate testament to the classic pairing of chocolate and nut butter, reimagined as a decadent, towering masterpiece. This dessert isn’t just a treat; it is a multi-textured experience that balances a crunchy, dark chocolate base with a cloud-like mousse and a glossy silk pudding finish.
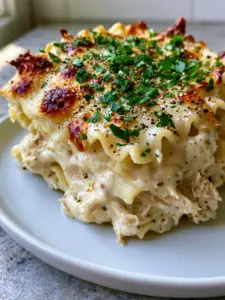
When you look at a tall, side-profile slice of this Peanut Butter Lasagna, you see a perfect architectural marvel of confectionery science. The foundation begins with a thick, compressed dark chocolate graham cracker crust that provides a bitter-sweet snap to every bite. This is immediately followed by a wide layer of fluffy, airy peanut butter mousse with a distinctive pale tan hue that melts on the tongue.
To deepen the decadence, we add a dense, glossy layer of dark chocolate silk pudding, creating a stark visual and textural contrast. The entire assembly is crowned with thick, unstable peaks of fresh white whipped cream and garnished heavily with chopped peanut butter cup chunks, a messy zigzag of warm melted peanut butter drizzle, and fine chocolate shavings. It is a handheld smartphone photo-worthy dessert that looks just as good as it tastes under soft natural afternoon sunlight.
Why You Will Crave This Layered Peanut Butter Masterpiece
- Textural Harmony: Experience the transition from a compressed, crunchy crust to a fluffy mousse, ending with a silky, glossy chocolate finish.
- No-Bake Simplicity: Achieve professional-grade results without ever turning on your oven, making this perfect for summer entertaining or busy holidays.
- Bold Visual Contrast: The stark layers of pale tan mousse against dark chocolate pudding create a striking side profile that rivals any gourmet bakery offering.
- Balanced Sweetness: By using dark chocolate graham crackers and a hint of salt in the peanut butter, we ensure the richness never becomes cloying.
Essential Components for Your Peanut Butter Lasagna
To achieve the specific visual results of our “Visual Recipe Blueprint,” every ingredient serves a structural and aesthetic purpose. We do not just want flavor; we want that iconic tall slice that holds its shape on a minimalist white ceramic plate.
Dark Chocolate Graham Crackers: 2 cups (200g) of crushed crackers form the base. The dark cocoa notes are essential to balance the high fat content of the peanut butter layers.
Unsalted Butter: 1/2 cup (115g) of melted butter acts as the “glue” for your crust. It ensures the base is compressed and firm enough to support the heavy layers above it.
Full-Fat Cream Cheese: 16 oz (450g) at room temperature provides the structural integrity for the mousse. This ensures your peanut butter layer is fluffy yet stable enough to stack.
Creamy Peanut Butter: 1 1/2 cups (380g) of a standard commercial brand (like Jif or Skippy) works best here. Natural oils in organic peanut butters can sometimes cause the mousse to separate.
Powdered Sugar: 2 cups (240g) sweetens and stabilizes the cream cheese layer. It dissolves instantly to maintain that airy, pale tan hue described in the visual prompt.
Heavy Whipping Cream: 3 cups (720ml) divided. You will use some for the mousse and the rest for those “unstable peaks” of fresh whipped cream on top.
Instant Dark Chocolate Pudding Mix: Two 3.9 oz (110g) boxes create that dense, glossy layer. Using “Dark” chocolate ensures the visual contrast between the layers is maximized.
Whole Milk: 3 cups (710ml) of cold milk is required to whisk the pudding into a thick, silk-like consistency that won’t run when sliced.
Peanut Butter Cups: 1 cup (150g) of roughly chopped chunks. These provide the “messy” garnish look and a necessary textural crunch to the topping.
Chocolate Shavings & Drizzle: A combination of melted peanut butter and chocolate sauce provides the professional finishing touch seen in high-end food photography.
Professional Tools for the Perfect Slice
Using a 9×13 inch (23x33cm) glass baking dish is traditional, but for that “tall side-profile” look, a springform pan can also be used. A high-speed hand mixer or a stand mixer is non-negotiable for achieving the airy volume required for the mousse layer. You will also need an offset spatula to ensure the glossy pudding layer is perfectly level before the whipped cream is added. For the best results, consider using a stainless steel pot to gently melt your peanut butter drizzle if you prefer the stovetop over the microwave.
Building the Foundation: The Dark Chocolate Crust
The first step in creating your Peanut Butter Lasagna is the crust. Unlike a southern tomato pie which requires a flaky baked crust, this no-bake base relies on refrigeration for its strength.
Step 1: Crushing and Compressing
Pulse your dark chocolate graham crackers in a food processor until they resemble fine sand. Mix with the melted butter until the texture is like wet sand. Press this mixture firmly into the bottom of your dish using the bottom of a flat measuring cup to ensure it is “thick and compressed” as per our visual blueprint.
Step 2: The Flash Chill
Place the crust in the freezer for 15 minutes. This “sets” the butter, preventing the mousse layer from picking up crumbs when you spread it. A firm base is the secret to getting that clean fork-bite texture shown in the final photos.
Creating the Airy Peanut Butter Mousse Layer
This is the heart of the Peanut Butter Lasagna. We want a “pale tan hue” and a texture that feels like a cloud.
Step 3: Creaming the Base
Beat the room-temperature cream cheese and creamy peanut butter together until completely smooth. There should be no visible white streaks of cream cheese. Gradually add the powdered sugar, beating on low then high until the mixture is light and voluminous.
Step 4: Folding for Volume
In a separate bowl, whip 1 cup (240ml) of heavy cream to stiff peaks. Gently fold this into the peanut butter mixture using a silicone spatula. Do not over-mix, or you will lose the “fluffy, airy” quality. Spread this over your chilled crust in an even, wide layer.

The Glossy Dark Chocolate Silk Pudding Layer
While a million dollar lasagna uses savory ricotta, this dessert lasagna uses a rich chocolate silk to provide the “dense” middle layer.
Step 5: Whisking the Silk
In a large bowl, whisk together the instant dark chocolate pudding mix and the cold whole milk. Continue whisking for 2 minutes until the pudding starts to thicken. It should look “dense and glossy.”
Step 6: Spreading the Silk
Carefully pour the pudding over the peanut butter mousse. Use an offset spatula to smooth it to the edges. The contrast between the tan mousse and the dark pudding is what gives this dish its “multi-layered” visual appeal.
Crowning with Fresh Whipped Peaks and Garnishes
The final aesthetic is all about “unstable peaks” and “messy zigzags.” This isn’t meant to look perfect; it’s meant to look indulgent.
Step 7: Whipping the Topping
Whip the remaining 2 cups (480ml) of heavy cream with 2 tablespoons (30g) of powdered sugar until you achieve soft-to-medium peaks. Dollop this onto the chocolate layer, using the back of a spoon to create those tall, dramatic peaks described in the Midjourney prompt.
Step 8: The “Messy” Finishing Touches
Warm 1/4 cup (64g) of peanut butter in the microwave for 20 seconds until pourable. Use a spoon to create a “messy zigzag” across the top. Follow with chocolate sauce, a heavy hand of chopped peanut butter cups, and fine chocolate shavings. The “soft natural afternoon sunlight” will catch the gloss of the drizzle beautifully.

Expert Tips for Success
- Room Temperature is Key: Ensure your cream cheese is truly softened. If it’s cold, your mousse will have tiny lumps instead of that smooth, pale tan appearance.
- The Clean Slice: To get that perfect side-profile slice, wipe your knife with a warm, damp cloth between every single cut. This prevents the dark pudding from smearing into the light mousse.
- Chill Time: This lasagna needs at least 4 hours in the fridge, but overnight is better. The layers need time to “marry” and the crust needs to fully solidify.
- Stabilizing the Cream: If you need the “unstable peaks” to last longer for a party, you can add a teaspoon of gelatin or a specialized whipped cream stabilizer to the heavy cream.
Storage, Reheating & Freezing
The Peanut Butter Lasagna is a fantastic make-ahead dessert. It can be stored in the refrigerator, tightly covered with plastic wrap, for up to 5 days. Note that the “unstable peaks” of whipped cream may slightly deflate over time, but the flavor will remain exceptional.
For longer storage, this dessert freezes beautifully. Wrap the entire dish in a double layer of plastic wrap and foil. It will keep for up to 3 months. To serve, thaw it in the refrigerator for 4-6 hours. Do not thaw on the counter, as the dairy layers can lose their structure.
What to Serve With This Decadent Dessert
Because this Peanut Butter Lasagna is incredibly rich, it pairs best with items that offer a bit of acidity or a savory break. If you are serving this at a large gathering, consider starting with a light main course like a tomato tart or a fresh pico de gallo with chips to cleanse the palate before the main event.
For a winter gathering, a bowl of jalapeno popper soup provides a spicy contrast to the cool, creamy peanut butter. If you’re looking for more lasagna-style inspiration, don’t miss our savory chicken alfredo lasagna for your next dinner party.
Frequently Asked Questions
Absolutely. Wrap it tightly in plastic wrap and foil. It will keep for up to 3 months. Thaw in the refrigerator for several hours before serving to maintain the creamy texture.
Yes! This is actually better when made 24 hours in advance. The layers set more firmly, making it easier to serve. Just wait to add the ‘unstable peaks’ of whipped cream until right before serving for the best visual appeal.
It is not recommended. Natural peanut butter often separates, which can cause the mousse to lose its airy structure and become oily. Stick to commercial creamy brands like Jif or Skippy for the best results.
The secret is to chill the dessert for at least 4-6 hours (or overnight) and to wipe your knife with a warm, damp cloth between every single cut. This prevents the dark pudding from bleeding into the tan mousse.
You can use regular chocolate graham crackers or even crushed Oreo cookies (with the filling removed or kept for extra sweetness). Just ensure you compress the crust firmly to support the heavy layers.
The Ultimate Peanut Butter Lasagna Recipe Card

Peanut Butter Lasagna: The Ultimate No-Bake Chocolate Layered Dessert
Ingredients
Equipment
Method
- Combine dark chocolate graham cracker crumbs and melted butter. Press firmly into the 9x13 dish.
- Chill the crust in the freezer for 15 minutes to set.
- Beat cream cheese and peanut butter until smooth. Add powdered sugar until fluffy.
- Whip 1 cup of heavy cream and gently fold it into the peanut butter mixture. Spread over the crust.
- Whisk pudding mix and milk for 2 minutes. Spread the dense, glossy mixture over the mousse.
- Whip remaining cream into peaks and dollop on top. Finish with chopped PB cups, melted PB drizzle, and chocolate shavings.
Notes
Chill for at least 4 hours to ensure the tall side-profile holds its shape.

Join the Hearth Gourmet Community!
This Peanut Butter Lasagna is more than just a recipe; it’s a centerpiece that brings people together. We would love to see your “tall, side-profile” recreations! If you made this dish, please leave a comment below and share your photos with us on Pinterest.
Looking for more comfort food? Sign up for our newsletter to get the latest recipes like our creamy potato and hamburger soup delivered straight to your inbox. Happy layering!