There is a specific kind of magic that happens when dough hits hot oil, transforming from a flat disc into a golden, bubbling masterpiece. If you have been searching for the perfect homemade chalupa recipe, you know that the secret lies entirely in the architecture of that shell—the contrast between a shatteringly crisp exterior and a soft, pillowy heart.
This isn’t your average taco night; this is a deep-dive into the world of Mexican-inspired street food that rivals any restaurant version. We are recreating that iconic, extra-puffy fried bread and stuffing it with savory, seared beef and vibrant toppings that pop against a neutral stone background.
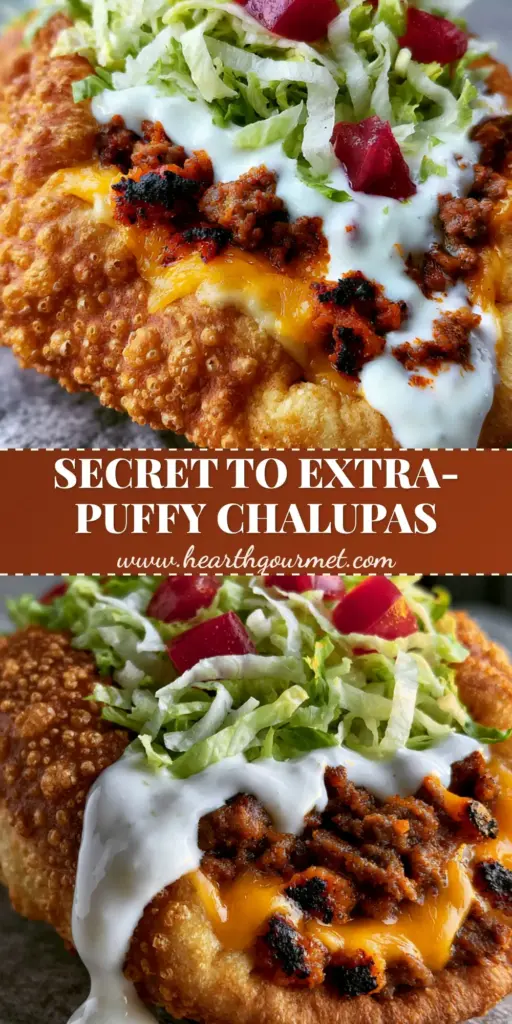
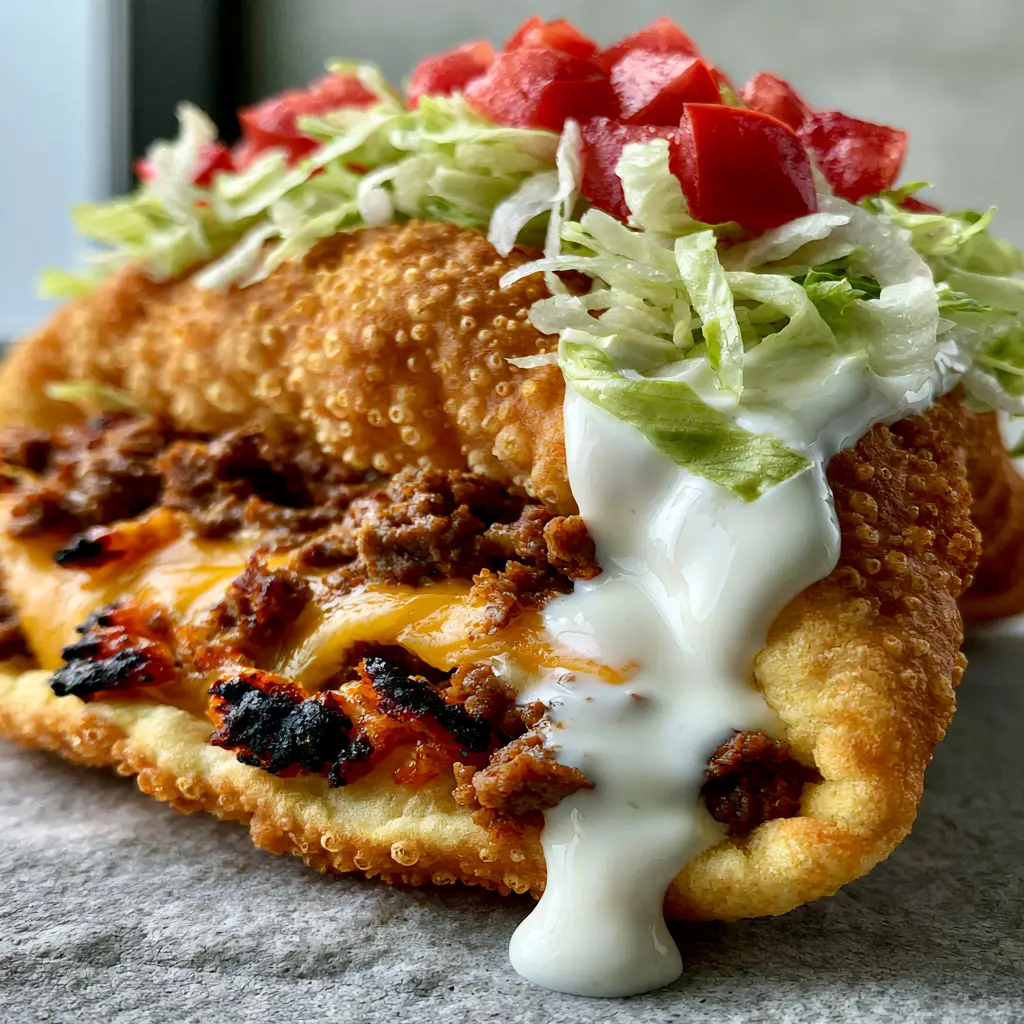
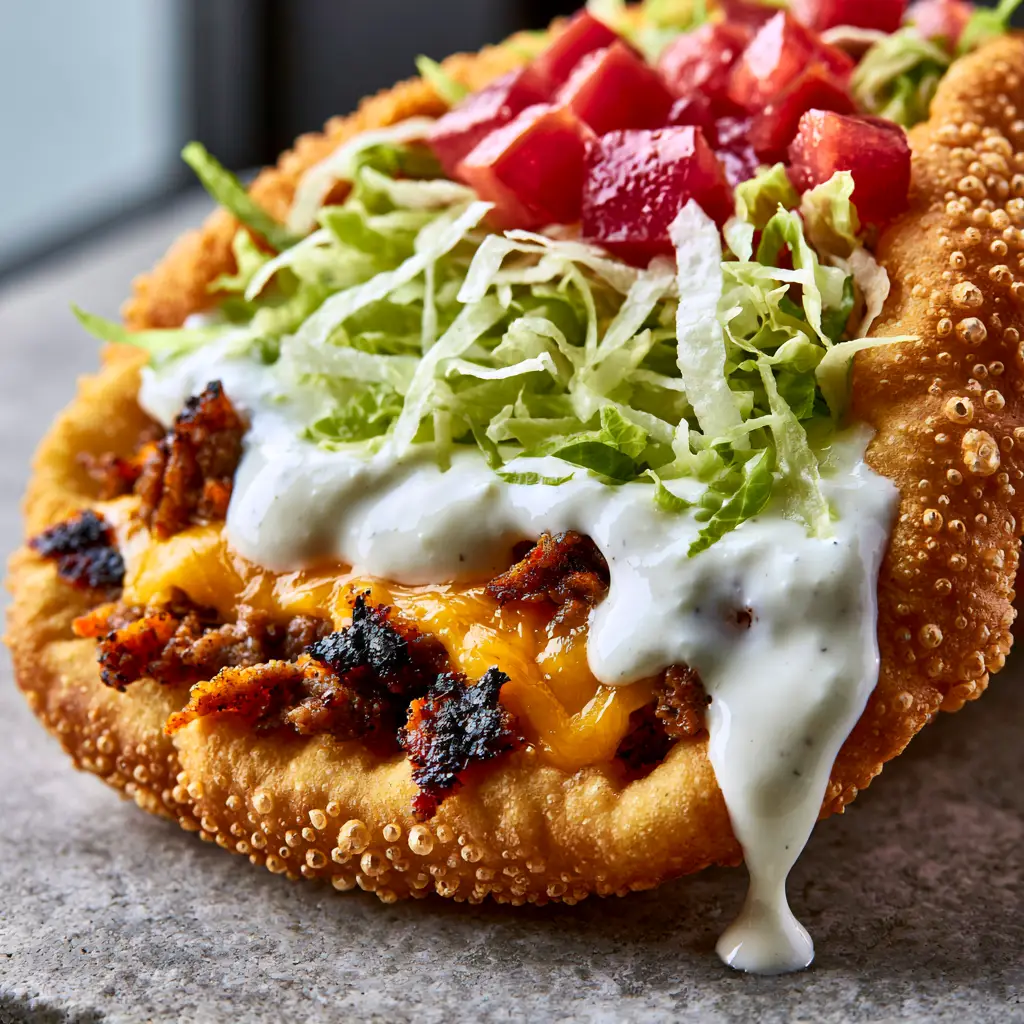
Every bite of this homemade chalupa recipe offers a masterclass in texture, from the tiny crispy air bubbles on the dough to the heavy drizzle of thick white Mexican crema. Prepare to elevate your kitchen skills as we master the art of the puffy fry-bread shell together.
The Secret to the Extra-Puffy Golden Chalupa Shell
The hallmark of a superior homemade chalupa recipe is the shell’s ability to hold its shape while remaining light as air. To achieve those characteristic golden bubbles and a soft interior, we rely on a specific ratio of leavening agents and high-heat frying techniques.
- Visual Perfection: We are aiming for a deep golden-brown hue with thousands of tiny, micro-bubbles across the surface of the dough.
- Shatter-Crisp Texture: The exterior must provide an audible crunch that immediately gives way to a tender, bread-like center.
- The “Charred” Beef Edge: By searing the seasoned ground beef at high heat, we create those sought-after charred bits that provide a smoky depth to the filling.
- Creamy Contrast: A heavy drizzle of thick white sour cream or Mexican crema is essential to balance the heat of the beef and the crunch of the shell.
Essential Components for Your Homemade Chalupa Recipe
Creating this dish requires a blend of pantry staples and fresh produce, each serving a specific structural or flavor-driven purpose. Here is what you will need to assemble these puffy delights.
All-Purpose Flour (312g / 2 ½ cups): This provides the gluten structure necessary to hold those large air pockets without collapsing during the fry.
Baking Powder (10g / 2 tsp): The essential “invisible” ingredient that reacts with heat to create the pillowy, airy lift inside the dough.
Fine Sea Salt (6g / 1 tsp): Salt is critical here, not just for flavor, but to strengthen the gluten network in our flatbread dough.
Shortening or Lard (30g / 2 tbsp): Incorporating a solid fat into the flour ensures the interior remains soft and biscuit-like rather than chewy like a standard tortilla.
Whole Milk (180ml / ¾ cup): Milk adds a slight sweetness and helps the shell achieve that beautiful golden-brown color thanks to the natural sugars.
Ground Beef (454g / 1 lb): Use an 80/20 blend for the best flavor; the fat helps achieve those seared, charred bits mentioned in our visual blueprint.
Cheddar Cheese (115g / 1 cup): Sharp shredded cheddar provides a salty, melted layer that acts as the “glue” between the meat and the cold toppings.
Mexican Crema or Sour Cream (120ml / ½ cup): This should be thick and white, drizzled heavily to create that iconic “dripping” look down the side of the shell.
Iceberg Lettuce (2 cups, shredded): Finely shredded iceberg provides a cooling, watery crunch that is indispensable for the authentic texture.
Fresh Roma Tomatoes (2 large, diced): These must be vibrant ruby red and diced small to nestle into the crevices of the melted cheese.
Vegetable Oil (for frying): A neutral oil with a high smoke point is required to achieve the blistering heat needed for puffy dough.
Tools for Achieving the Perfect Puffy Fry
To master this homemade chalupa recipe, you don’t need a commercial kitchen, but a few specific tools will make the process much smoother. A heavy-bottomed cast iron skillet is ideal for maintaining the steady oil temperature required for consistent bubbling.
You will also need a rolling pin to ensure the dough discs are an even 1/4-inch thickness before hitting the oil. A pair of sturdy metal tongs is the most important tool for the “fold and hold” technique that gives the chalupa its signature U-shape.
Lastly, a digital meat thermometer is helpful for the oil—you are looking for a consistent 350°F (175°C). If the oil is too cold, the dough will be greasy; if it’s too hot, the outside will burn before the inside puffs.
Step-by-Step Mastery: Achieving That Pillowy Interior
Crafting the Dough Foundation
In a large mixing bowl, whisk together your flour, baking powder, and salt. Cut in the shortening using a pastry cutter or your fingers until the mixture resembles coarse crumbs.
Gradually add the milk, stirring until a shaggy dough forms. Knead the dough on a lightly floured surface for about 3-5 minutes until it becomes smooth and elastic, then let it rest for 20 minutes to relax the gluten.
Searing the Savory Beef Filling
While the dough rests, heat a skillet over medium-high heat. Add the ground beef, breaking it apart with a wooden spoon.
Season the meat with cumin, chili powder, and garlic salt. Allow the meat to sit undisturbed for 2-3 minutes at a time to develop those dark, seared charred bits that provide maximum flavor. Once cooked through, drain the excess fat and keep the meat warm.
The Art of the Puffy Fry
Divide your rested dough into 8 equal balls and roll each into a 6-inch circle. Heat 1 inch (2.5cm) of oil in your skillet until it reaches 350°F (175°C).
Carefully slide a dough disc into the oil. Within seconds, you should see tiny crispy air bubbles rising to the surface. Use your tongs to fold the dough in half gently, holding it in a “U” shape while the bottom fries for about 30-45 seconds.
Flip the shell to fry the other side until the entire exterior is a uniform golden-brown. Remove and drain on a wire rack or paper towels to maintain the crunch.
Assembling the Visual Masterpiece
While the shells are still warm, drop a generous amount of shredded cheddar cheese into the bottom so it begins to melt. Top with the seared seasoned ground beef.
Add a heavy drizzle of the thick white Mexican crema, letting it drip down the sides of the puffy shell. Finish with a handful of crisp shredded iceberg lettuce and a scattering of ruby red diced tomatoes.
Pro Tips for Maximum Crunch and Minimal Grease
- The Resting Period: Never skip the 20-minute dough rest; this ensures the shells puff up evenly rather than snapping back during the rolling process.
- Temperature Control: If you see the dough browning instantly without puffing, your oil is too hot. Lower the flame and wait two minutes before the next shell.
- Fresh Grating: Always shred your own cheddar from a block. Pre-shredded cheese is coated in potato starch, which prevents it from melting into that luxurious layer seen in our photos.
- The Crema Drizzle: If your sour cream is too thick to drizzle, whisk in a teaspoon of lime juice or milk to achieve the perfect “drip” consistency.
Storing and Reheating Your Golden Shells
A homemade chalupa recipe is best enjoyed immediately while the bread is at its peak puffiness. However, if you have leftovers, store the shells in an airtight container at room temperature for up to 24 hours.
To reheat and regain that “just fried” crunch, place the shells in an air fryer at 350°F (175°C) for 2-3 minutes. Avoid the microwave, as it will turn your beautiful fried bread into a chewy, rubbery mess.
The beef filling can be refrigerated for up to 4 days or frozen for 3 months. Always assemble the fresh toppings (lettuce, tomatoes, crema) just before serving to maintain the contrast of temperatures.
The Ultimate Mexican Feast Pairings
To turn this homemade chalupa recipe into a full spread, consider what else belongs on your table. These puffy shells pair beautifully with authentic Mexican recipes like cilantro-lime rice or refried beans.
If you enjoy the seasoned beef profile of this dish, you might also love the savory depth of cuban picadillo beef, which uses similar aromatic spices. For those who enjoy creative handhelds, our smash dumpling tacos offer another modern twist on the taco concept.
Looking for a lighter side? A simple tomato-based soup or even a hearty ground beef vegetable soup can complement the richness of the fried dough perfectly.
Frequently Asked Questions
While you can, pizza dough is more elastic and chewy. This homemade recipe uses shortening and baking powder for a more authentic, biscuit-like interior.
Avoid overcrowding the pan and let the beef sit undisturbed for 2-3 minutes on high heat before stirring to allow a crust to form.
Mexican Crema is a thickened cream that is slightly saltier and thinner than American sour cream. You can substitute sour cream thinned with a little milk or lime juice.
A taco typically uses a soft or hard corn/flour tortilla, while a chalupa is made from a thicker leavened dough that is deep-fried to become puffy and bread-like.
This usually happens if your baking powder is expired or if the oil isn’t hot enough. Ensure your oil is exactly 350°F (175°C) before frying.
The Ultimate Homemade Chalupa Recipe
Homemade Chalupa Recipe: How to Make the Ultimate Crispy, Puffy Flatbread Tacos
Ingredients
Equipment
Method
- Whisk flour, baking powder, and salt. Cut in shortening until crumbly.
- Add milk to form dough. Knead for 3-5 minutes until smooth. Rest for 20 minutes.
- Brown beef in a skillet over medium-high heat. Allow to sear for charred bits. Season and drain.
- Roll dough balls into 6-inch circles. Fry in 350°F oil for 30-45 seconds per side in a U-shape until golden and bubbly.
- Layer cheese, beef, crema, lettuce, and tomatoes inside the warm shell.
Notes
Resting the dough is non-negotiable for the right texture.
Experience the Crunch of a Perfect Chalupa
There is nothing quite like the satisfaction of biting into a shell you fried yourself. This homemade chalupa recipe brings the vibrant textures of a professional kitchen into your home, resulting in a dish that looks exactly like a high-quality handheld smartphone photo.
The contrast between the crunchy fried bread and the creamy sauce is a culinary experience you won’t soon forget. If you enjoyed making these, please leave a comment below and let us know how your shells puffed up!
Don’t forget to share your creations and follow us on Pinterest for more visual recipe inspiration and kitchen tips.